Datum Targets - GDT - A Better Understanding
Some manufacturing processes, such as casting, forging, welding, and heat treating, are likely to produce uneven or irregular surfaces. Datum targets may be used to immobilize parts with such uneven or irregular surfaces. Datum targets may also be used to support irregular-shaped parts that are not easily mounted in a datum reference frame. Datum targets are used only when necessary because, once they are specified, costly manufacturing and inspection tooling is required to process them.

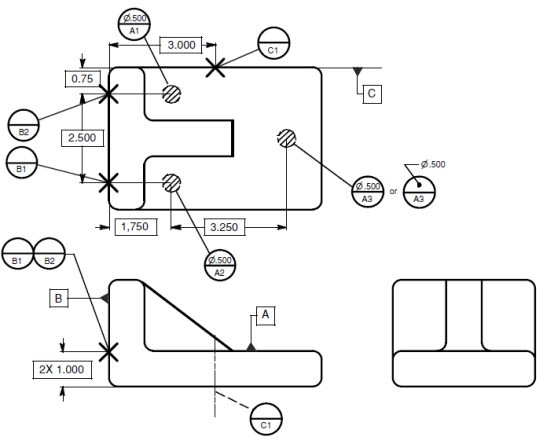
Datum targets are designed to contact parts at specific points, lines, and areas. These datum targets are usually referenced from three mutually perpendicular planes to establish a datum reference frame. A primary datum plane is established by a minimum of three datum targets not in a straight line. Two datum targets are used to establish a secondary datum plane. And one datum target establishes a tertiary datum plane. A combination of datum target points, lines, and areas may be used. Datum target points are represented on a drawing by target point symbols and identified by datum target symbols such as datum targets B1 and B2 shown in Figure.
Actual tooling points on the fixture are not points at all but pins with hemispherical ends contacting the part with the highest point on the hemisphere, as shown in Figure. A datum target line is represented by a target point symbol on the edge of the part in the top view of the drawing and by a phantom line on the front view, datum target C1. Since datum target C1 is on the far side of the part, a dashed radial line is used to connect the datum target symbol. Where a datum target area is required, the desired area is outlined by a phantom line and filled with section lines, as shown for datum targets A1, A2, and A3. All datum targets are dimensioned for location and size either by toleranced dimensions or basic dimensions. Basic dimensions are toleranced with gage-makers’ tolerances.
Note that A1, A2, A3 are datum target areas and B1, B2 are datum target points and C1 is datum target line.
Labels: ASME, Engineering Standards and Codes, feature, GDT, Machine Design


